

Tearing Tester Operation Process
1.Take a sample
Prepare Specimen
Prepare a certain number of specimens according to the requirement of test. Check to make sure there are no obvious defects on the specimen. The number of specimen should be no less than 3.
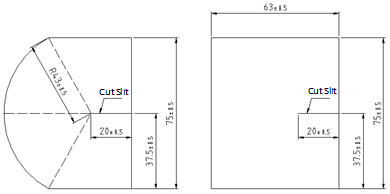
Specimen shape
Two types of specimens can be tested: constant-radius and rectangular, specifications as below
Pretreatment of Specimen
Unless there is other specification on conditioning time and environment of specimen, the specimen should be kept for at least 72 hours at temperature of 23±1℃ and relative humidity of 50±5%RH.
2.Modulate horizontal position
Set the tester upright on a steady table or work bench. Adjust the four foot screw to find the horizontal position with help of the level bubble.
3.Calibration
NOTICE: The calibration of the instrument is completed before shipment. Do not alter the parameters of calibration, or this alteration may lead to incorrect test results. However, it is helpful for the operator to understand the calibration process.
- Enter the calibration interface from the main menu.
- The password for entering calibration is "888888"
Torque Calibration
Note: The torque data values are factory data, please do not modify!!
Friction Angle Calibration
- After selecting the corresponding range through (for example, A Range), press the key, and input the password 11111 to enter the zero angle calibration interface.
- Follow the prompts and press the key to confirm.
- Push the pendulum back to the starting position (by pressing the key to lock the pendulum.)
- Press the key without holding any sample. The pendulum is automatically released in 1 second, the swing angle is measured, press key to save the data.
NOTE:
- The same range can be calibrated multiple times until the ideal value is obtained. That is the corresponding range.
- Checking after angle calibration: Without loading the sample, press the key to release the pendulum. The force is closer to 0, the result is better.
NOTE:
-
The friction angle calibration is the horizontal position calibration of the instrument moving to different places! ! (The level bubble is roughly horizontal, the instrument does not know, so the horizontal position should be calibrated. )
-
The reference angle of A range: 136.5 ~ 138 degrees and B range 138 ~ 139.5. The calibration angle of both ranges can’t be ≥140 °)
Weight Calibration
NOTE: This is factory setting function, and is used to adjust the instrument.
Please contact the manufacturer first for advice.
- Press the key to enter weight calibration interface.
- Install the standard block, enter the weight of the standard block and press the key to enter
- Push the pendulum back to the starting position (by pressing the key to lock the pendulum.)
- Without holding any sample, press the key to release the pendulum.
- Compare the measured value F and the theoretical value F 'of energy consumption. It’s suggested the test result do not exceed 1% of the displayed value.
4.Test Process
- Power on the instruments and prepare the conditioned specimen at hand.
- Observe the balance of the tester. Make sure the ….
- Lift the pendulum and the latch automatically lifts and latches it. Make sure the pendulum and the latch is gently contacted. NOTE: Make sure the finger, hand or any hard object is in the specimen clamp motion range to avoid its damage or jammed finger risk.
- Load test specimens and do test. (Refer to part 3.3.)
- Finish all the tests needed.
- Remove the specimen, and turn off power supply and gas source of instrument. Cover the instrument with dust-proof cloth. Keep the cloth clean from any dust.